Configuring your Default Policy
Policies include several settings but mainly determine what categories of a website a user can access and the entries to your allow and block lists. A default policy is assigned to your account when your account is created, but you can adjust the settings by following the steps below.
Your default policy is automatically assigned to all new locations, devices and users you add to WebTitan unless you choose to apply a custom policy in Content Filtering > Settings. See Creating a Custom Policy.
Follow these steps to edit your default policy.
Go to Settings > Default Policy to view your current default policy settings. The Policy Details tab displays and you can also select Allowed & Blocked Domains and Notifications to move to those tabs.
Filtering Options:
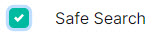
Safe Search: Safe Search filters out explicit or potentially offensive search results on Google, Bing and YouTube and helps avoid most adult content search results. Select Safe Search to enable.
Unclassified Traffic: Unclassified traffic is generally traffic from websites that are new and are not yet assigned to a category in the central web categories database. Select Allow Unclassified Traffic to enable.

Content Filtering:
Policies are configured to allow or block access to particular categories. A category is a list of websites that are grouped together based on their dominant content. For example, Education, Alcohol, Finance, etc.
See Category Descriptions for a description of each category.
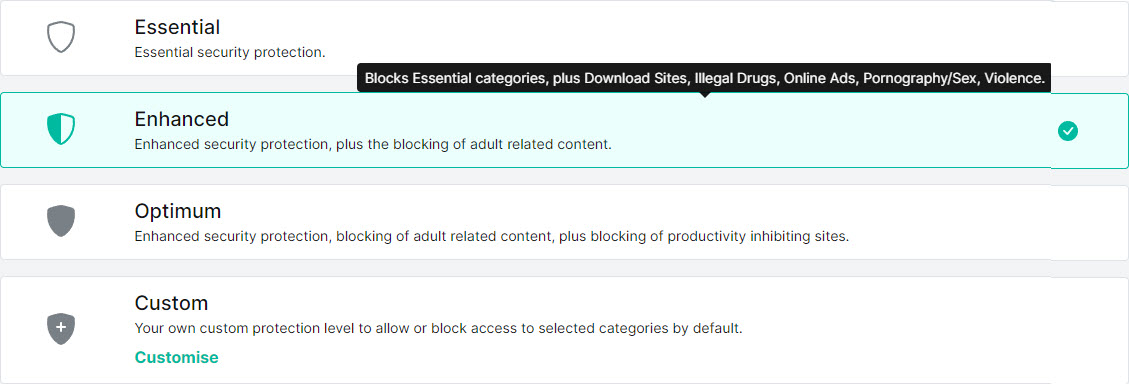
Your default policy allows you to select one of three predefined content filtering levels (category groupings): Essential, Enhanced, Optimum. You can also select Custom and create your own custom content filtering level (see below).
See Content Filtering Level Descriptions for a description of each level.
To create your own custom content filtering level:
Select Customise and the Custom Content Filter window displays.
Select the categories you want to include for your custom level.
Note
You must select or unselect at least one category in this window to save your custom content filtering level.
Select Save Changes.
Allowed & Blocked Domains:
Select the Allowed & Blocked Domains tab to manage allowed and blocked domains for your default policy.
Allowed Domains: If you block access to a particular category, for example, Spyware and Malicious Sites, then all websites within that category will be blocked. However, you can allow access to a website that is included in a blocked category by adding it as an Allowed Domain.
Blocked Domains: If you allow access to a category, for example, Art, then all websites within that category will be allowed. However, you can block access to a website that is included in an allowed category by adding it as a Blocked Domain.
See below to add a single allow or block domain. You can also bulk import domains, see Importing Domains.
To add an allow or block domain:
Select Add Domain and choose to Allow a Domain or Block a Domain.
Complete the fields in the pop-up:
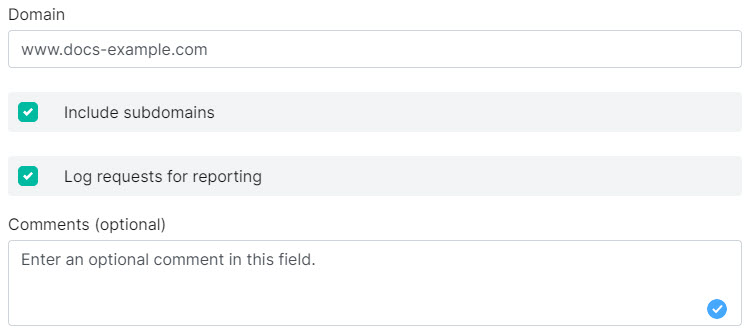
Domain: Enter the domain you want to allow or block.
Top level domain entries (TLDs) are supported. For example, to allow or block all domains from a particular country enter the TLD for that country. For example, ru.
Caution is advised when adding TLDs as you may allow or block more domains than expected. For example, adding com as a blocked TLD will block all domains ending in .com
Note
Only enter the TLD. Wildcards (*) and periods (.) are not required. For example:

Include subdomains: If your domain is example.com and you select this option, then all domains that end in example.com will also be allowed or blocked, e.g. support.example.com and products.example.com.
Include subdomains: must be selected to save this entry if a TLD is entered in the Domain: field
Log requests for reporting: Deselect to prevent requests from going to the logger for reporting.
Comments: Optional comments about this allow or block domain.
Click Apply.
Notifications:
You can specify a single email address to receive notifications when a website that is blocked by a policy is visited:
Select the Notifications tab.
Enter an email address.
Select the blocked categories you want to be notified about. For example, if you want to receive an email notification if a user attempts to access a website in the Spam category, select Spam.
Click Save Changes.
Click Save Changes to save any changes you have made to your default policy. If you navigate away without saving any changes will be discarded.