Deploying OTG for Mac Using Intune
This information describes deploying WebTitan OTG for Mac to multiple users using Microsoft Intune, which is part of the Microsoft Endpoint Manager platform.
Note
If you intend to push OTG to a Mac that is being used by multiple users, you must ensure that all of those users are included in the deployment.
Important
As a best practice, consider the following:
Test your deployment using a limited test group with just one or two users first before full deployment.
Create an OTG uninstall group. Add this uninstall group as an Excluded Group when assigning groups in the configuration steps below. You only need to add users to the uninstall group if you are uninstalling OTG.
Depending on your environment and how long it takes for clients to synchronize, you may need to wait for a period of time after deploying your certificate and extensions (Steps 1 - 5 below) before deploying the OTG script in Step 8.
Step 1: Download the OTG install file.
To complete these steps, you first need to click here and download the OTG for Mac install file (otg_setup.pkg). Save this file to a location accessible via HTTPS where the OTG deployment script can grab it. For example, https://www.example.com/downloads/setup.pkg.
The current OTG for Mac version is 2.0.3 (2).
Step 2: Download and rename your WebTitan 4K certificate.
In WebTitan, go to Settings > Certificates and download your 4K WebTitan SSL certificate.
The certificate downloads as a .der file. You must change this to .cer before uploading it to Intune. For example, if you download your-webtitan-cert.der you must rename it to your-webtitan-cert.cer.
Tip
If you can not see the certificate extension, go to View > Options in the Downloads folder and select the View tab from the Folder Options window.
Uncheck Hide extensions for known file types.
Step 3: Create a configuration profile to upload and push the .cer certificate
Go to your Microsoft Intune admin center (Microsoft Endpoint Manager).
Choose Devices from the sidebar menu.
Go to macOS > Configuration profiles and select + Create profile.
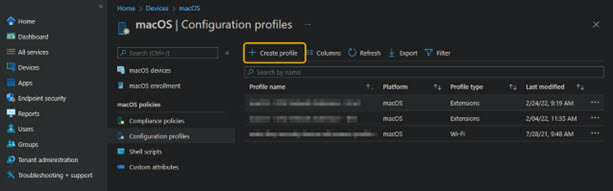
In the Create a profile window on the right select the following:
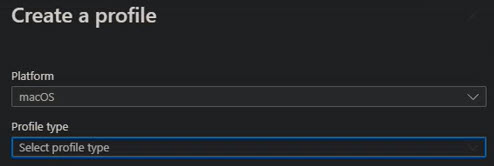
Platform: select macOS.
Profile type: select Templates.
Select Trusted Certificate.
Click Create.
On the Trusted certificate page, go through each tab and select the following:
Basics: Enter a name for the certificate and click Next.
Configuration Settings: upload your .cer certificate and click Next.
Assignments: Select Included groups and add the groups you want to deploy this cert to.
Assignments (optional): Select Excluded groups and add any group you want to exclude. For example, an OTG Uninstall group. Click Next.
Review + create: Review what you have added and click Create.
Step 4: Create a configuration profile to push a kernel extension before deploying OTG
This profile is needed for macOS 10.15 (Catalina) or earlier. It will be ignored on newer macOS.
Note
Apple Silicon (M1 and M2) devices do not support KEXT. Therefore, installing a configuration profile consisting of KEXT policies will fail on these devices -- this is expected.
In Intune, choose Devices from the sidebar menu.
Go to macOS > Configuration profiles and select + Create profile.
In the Create a profile window on the right select the following:
Platform: select macOS.
Profile type: select Templates.
Select Extensions.
Click Create.
In the Extensions window, go through each tab and select the following:
Basics: Enter a name for the kernal extension and an optional description, and click Next.
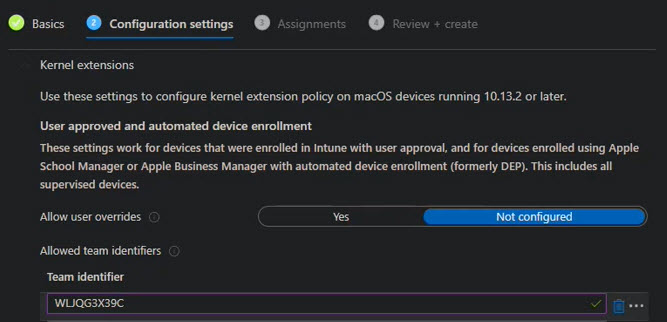
Configuration settings: Select Kernel extensions.
Configuration settings: Enter Team identifier WLJQG3X39C and click Next.
Assignments: Select Included groups, and add the groups you want to deploy this kernel extension to.
Assignments (optional): Select Excluded groups and add any group you want to exclude. For example, an OTG Uninstall group. Click Next.
Review + create: Review what you have added and click Create.
Step 5: Create a configuration profile to push a system extension before deploying OTG
In Intune, choose Devices from the sidebar menu.
Go to macOS > Configuration profiles and select + Create profile.
In the Create a profile window on the right select the following:
Platform: select macOS.
Profile type: select Templates.
Select Extensions.
Click Create.
On the Extensions page, go through each tab and select the following:
Basics: Enter a name for this system extension and an optional description, and click Next.
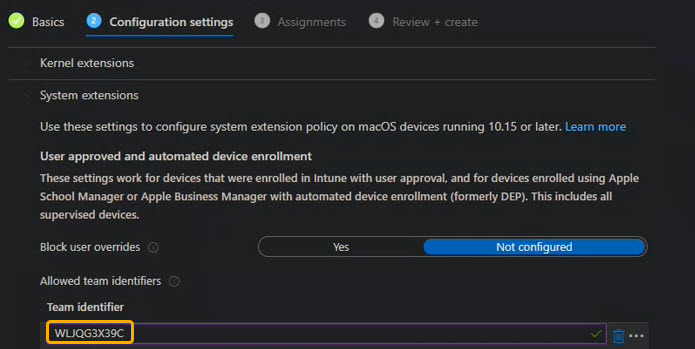
Configuration settings: Select System extensions.
Configuration settings: Enter Team identifier WLJQG3X39C and click Next.
Assignments: Select Included groups, and add the groups you want to deploy this system extension to.
Assignments (optional): Select Excluded groups and add any group you want to exclude. For example, an OTG Uninstall group. Click Next.
Review + create: Review what you have added and click Create.
Step 6: Create a configuration profile to push a network extension before deploying OTG.
Copy the save the OTG.mobileconfig below to your local machine as a .mobileconfig file. This config is used to silence prompts during OTG installation.
Choose Devices from the sidebar menu.
Go to macOS > Configuration profiles and select + Create profile.
In the Create a profile window on the right select the following:
Platform: select macOS.
Profile type: select Templates.
Select Custom.
Click Create.
On the Extensions page, go through each tab and select the following:
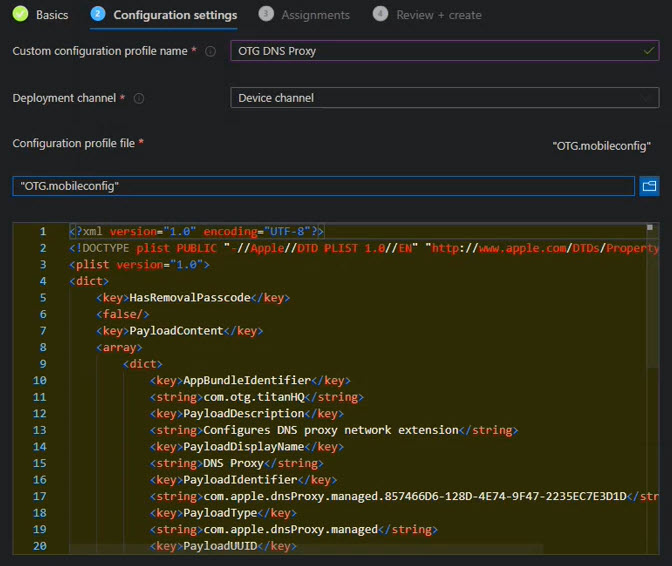
Basics: Enter a name for the profile (for example, OTG Network extension) and click Next.
Configuration settings: Give a custom configuration profile name, for example, OTG DNS Proxy.
Configuration settings: Ensure the Deployment channel is Device channel.
Configuration settings: Browse and select the OTG.mobileconfig file you saved in Step 1 of this section.
Assignments: Select Included groups, and add the groups you want to deploy this network extension to.
Assignments: Select Excluded groups and add any group you want to exclude. For example, an OTG Uninstall group. Click Next.
Review + create: Review what you have added and click Create.
Step 7: Copy, save and edit your install script.
Copy and save the sample-macOS-install-script below to your local machine as a .sh file.
Open the install script you saved to your local machine and edit the following:
webURL="https://www.example.com/downloads/otg_setup.pkg": change this URL to the location you saved otg_setup.pkg to in Step 1.
Edit the two required parameters described in the table below, RPC_URL and INSTALL_KEY with your own details.
There is also an optional LOCATION_NAME parameter described below, but it is not necessary.
Important
If you do not use the LOCATION_NAME parameter, you must remove location_name="OTG_Mac_Prod" under Customer Defined Variables from your script.
Required Parameter
Description
Example
RPC_URL
Your WebTitan OTG URL and (optional) port number. See WebTitan OTG URLs to determine your OTG URL.
The RPC port is always port 7771 and is automatically added if not included in the RPC_URL parameter. The example(s) show the accepted formats.
https://your-otg-url.webtitancloud.com
INSTALL_KEY
This is the OTG install key used to register an OTG device on WebTitan. You can get this in WebTitan from Settings > Device Configuration and noting the OTG Install Key.
00000z0z-0zz0-0000-zz0z-0zz000z0zz0z
Optional Parameter(s)
Description
Example
LOCATION_NAME
When OTG 2 is installed, a virtual location is automatically created for a device on WebTitan and given a default name. However, you can specify a location name to use with the LOCATION_NAME parameter on install.
A virtual location can either be created on WebTitan before installation and then the name can be used in this parameter, or, if not already created, the virtual location is created and assigned the name given in this parameter on install.
LOCATION_NAME=Training-PCSave the changes you have made and close the install script.
Step 8: Add your script and deploy OTG to your devices.
Choose Devices from the sidebar menu.
Go to macOS devices > Shell scripts and select + Add.
In the Add script window, go through each tab as follows:
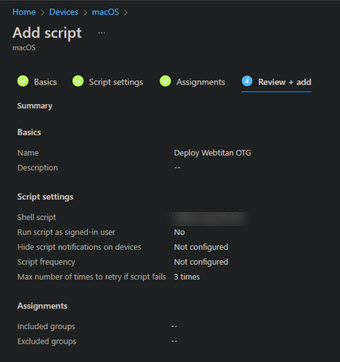
Basics: Enter a name for your script and click Next.
Script settings: Use Upload script to upload the install script you created in Step 6 above.
Script settings: Set Max number of times to retry if script fails to 3 times and click Next.
Assignments: Select the users you want to deploy to and click Next.
Review + create: Review what you have added and click Add.
Once you have added your script, WebTitan OTG for Mac will start rolling out to the assigned users.
You can click Monitor in the sidebar menu and Device install status to view the progress of your deployment. However, the best way to validate the rollout is to check if devices have been added to your WebTitan.
For more information on refresh cycles in Intune see https://learn.microsoft.com/en-us/mem/intune/configuration/device-profile-troubleshoot#how-long-does-it-take-for-devices-to-get-a-policy-profile-or-app-after-they-are-assigned  .
.