
View Campaign Details
You can drill down to specific details about a phishing campaign from either the Phishing Simulation > Overview or Phishing Campaigns pages. For example, you can see who is enrolled in the campaign and when lures are scheduled for delivery. You can find these details by following the steps below.
To begin, go to Phishing Simulation. As you navigate through the UI, you can manage how results are displayed as follows:
Use the Search
 box to search the list of customers and the list of campaign names.
Select the column
 icon to manage how table columns are displayed. By default, all columns are visible and arranged in a specific order. You can change the display by doing the following:
Select or deselect the checkbox beside a column name to show or hide a column.
Use the reordering
 icon to move columns up and down the list. This changes the left-to-right display. An item at the top of the list, for example, means that it will be the first column on the left. Select Reset Order to restore the columns to their default positions.
Resize columns by hovering your cursor over the column boundary you want to adjust until it becomes a resize
 cursor. Drag the boundary until the column is the width you want.
Select the up/down
 arrows in the column headers to sort column content.
To select a phishing campaign based on the customer it is assigned to, select Overview. In the table, locate the campaign that you want to view in the Campaign Name column.

Alternatively, if you access phishing campaign details from Phishing Campaigns, you can see how many customers are assigned to it. Locate the campaign in the table that you want to view. You can filter the results by using Search or click on the column name to sort.

Click on the campaign name link to view specific details, which are displayed in a new window.

Note
If you accessed the phishing campaign details from the Phishing Campaigns page and there is more than one customer assigned to the campaign, you can use the customer dropdown menu to switch between customers.
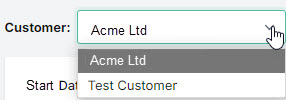
The content on the Phishing Campaign details page will repopulate whenever you select a different customer.
The details are separated into two sections, which are described below.
Header
End date: Date on which your phishing campaign stops sending lures. If this is a Continuous Campaign, then there is no end date.
Campaign status: Indicates the state of the phishing campaign, based on the following:

If the Phishing Campaign is Active, then this means that customers enrolled in the campaign are receiving lures.

Phishing Campaigns with a status of Planned means that the campaigns have been created, but the start date hasn't occurred yet. No lures will be sent until the start date.

This was a planned or active phishing campaign that was Deleted, and now appears in the Not Active list.

When a Phishing Campaign has finished running and is no longer Active, its status shows as Completed. This means that lures are no longer being sent.
Active Users: These are M365 users that will be targeted with lures for the duration of the campaign.
Users Table
By selecting a row in the users table, you can view lure content, which will help you understand what triggered the user's interaction with the lure. It also enables you to view any lure that a user has been sent or is scheduled to receive.
The table contains the following details:
User: Name of the individual enrolled in the phishing campaign.
Subject: The subject of the lure that was sent.
Note
Lure subjects may contain variable values, called tokens, which are replaced at the time the lure is sent. Some examples of tokens are name, date and currency values. In the table, they are displayed as placeholder text as follows:
FIRST_NAME: Name of the recipient.
CURRENT_DATE: Date the lure is sent.
CURRENCY: Currency symbol used in the lure.
Status: Indicates the status of the lure as follows:

Lure is scheduled for delivery on the date shown in the Scheduled column.

A lure with a status of Delivered means that it has been successfully delivered to the user's inbox.

An Undelivered status means that an attempt was made to send the lure, but it was not successfully delivered to the user's inbox.
Scheduled: Date and time that the lure was, or will be, sent.
Lure Reported: The date and time the user reported this lure using the Outlook Add-In.
Lure Clicked: The most recent date and time that the user interacted with the lure.
Clicks: Number of times a user has clicked on this lure.
Email: User's work email address. This is a hidden column that you can access from the column
icon.