Adding Corporate Customers
From the Corporate Customers window, you can select Add to add a new corporate customer.
Note
Two types of licenses are available for customers: Managed Email Security and Advanced Managed Email Security.
The Managed Email Security license involves setting up keyword(s) on the EncryptTitan system, and the end user adding a keyword to an email subject line to have it encrypted.
The Advanced Managed Email Security license offers content-based encryption, where a policy or policies are enabled on the customer account and user emails are then automatically assessed for specific content and encrypted if policy content is found. The license type also supports setting up keywords where the end user can force an email for encryption by adding the keyword to an email subject.
Be sure to follow the appropriate Customer Account Setup instructions for the license type assigned to the customer account.
Go to Admin > Corporate Customers and select Add.

In the Add Corporate Customer window that opens, do the following:
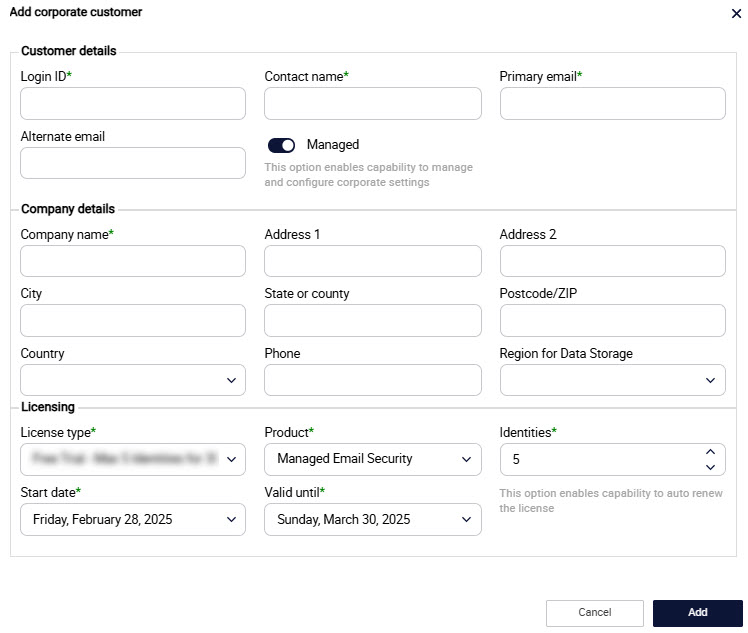
Customer Details
Login ID: Enter the Login ID for the primary admin on the corporate customer account.
Note
If additional admins are required on the corporate customer account, then identities on the domain can be given admin access.
Contact Name: Enter the first and last name of the primary admin for the corporate customer.
Primary Email: Enter the email address of the primary admin for the corporate customer.
Alternate Email (optional): Enter an alternative email address for the primary admin of your corporate customer.
Managed: The Managed toggle is enabled by default, which means that you can manage and configure corporate settings. If you disable the Managed toggle, then you won't be able to navigate to the customer account or change any settings on the customer account.
When the Managed toggle is turned on, a symbol is added before the Company name:
Company Details
Company Name: Enter the name of the company.
Address 1: Enter your corporate customer's address here.
Address 2: Enter your corporate customer's address here.
City: Enter the city where your corporate customer is located.
State or County: Enter the state or county where your corporate customer is located.
Postcode/ZIP: Enter the postcode or ZIP where your corporate customer is located.
Country: Select the country where your corporate customer is located.
Phone: Enter your corporate customer's phone number here.
Region for Data Storage: Select the region in which your corporate customer's data is stored.
Licensing
License Type: Select the license type for your corporate customer. The available options are:
Free Trial: Trial license that supports a maximum of 5 Identities for 30 days.
Proof of Concept: Trial license that supports a maximum of 25 Identities for 30 days.
Pilot: Trial license that supports a maximum of 50 Identities for 60 days.
Subscription: Subscription license for 365 days.
Product: Select the product for your corporate customer:
Managed Email Security (default): License that gives the customer keyword-based email encryption feature.
Advanced Managed Email Security: License that gives the customer Content Inspection of Emails feature.
Identities: Select the number of Identities (end users) that your corporate customer will have.
Note
This is the number of identities (end users) that the customer will set up on EncryptTitan. If the customer wants to add additional identities at a later date, then you will need to update this value.
Start Date: Select the dropdown arrow to configure the date on which your corporate customer's account will become active.
Valid Until: Select the dropdown arrow to configure the date on which your corporate customer's account will close.
Purchase Order Number: This field is only visible if you have selected the License Type Subscription - Paid 365 Days. Enter a number that uniquely identifies the corporate customer account.
Auto-Renew: This field is only visible if you have selected the License Type Subscription - Paid 365 Days. The auto-renew option is enabled by default and means that the customer license will be automatically renewed each year. If you disable auto-renew, you will need to manually add a new license for the customer account at the time of renewal. If a license expires on a customer account and their mail flow is directed to EncryptTitan, the mail will not be processed by EncryptTitan and will result in bounced emails and interruption to mail flow. You'll be prompted to confirm your decision to turn off auto-renew in a pop-up window.
Select Add.