Using the EncryptTitan Outlook Add-In
The EncryptTitan Outlook Add-In allows you to send secure emails easily from your Outlook client. Once successfully deployed or installed, the EncryptTitan Outlook Add-In is available in your Outlook desktop client and web application. See below for information on opening and pinning the add-in in Outlook, as well as information on sending an encrypted email.
The EncryptTitan Outlook Add-In offers all delivery encryption methods (TLS, Secure Portal (NRR) and Secure Portal (RR). However, if an encryption method has been disabled in EncryptTitan by your admin, the next available method will be used instead when sending an encrypted email.
Opening the EncryptTitan Outlook Add-In in your Outlook Client
Once the EncryptTitan Outlook Add-In has been deployed or installed, a user can follow the steps below to locate the add-in in their Outlook client and pin it so it remains available the next time you log into Outlook.
Select New > Mail to open a new email editor.
From the top toolbar, click the Apps icon and select Email Encryption.
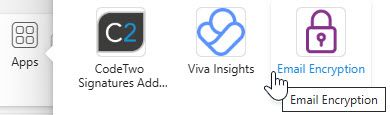
The EncryptTitan Outlook Add-In will open in a side panel named Email Encryption.
On the Email Encryption side panel, click the pin
 icon to keep the add-in open and available.
Sending an Encrypted Email from Outlook
Follow the steps below to send an encrypted email using the EncryptTitan Outlook Add-In.
Log in to either Outlook Web or your Outlook desktop client. If you do not see the EncryptTitan Outlook Add-In pane on the right of your screen, follow the steps above to open and pin the add-in.
Select New > Mail to open a new email editor. If the add-in has been pinned using the pin
icon, you will also see it when replying to or forwarding an email.Note
Emails to internal recipients will only be encrypted if your mail server has been configured for both internal and external recipients.
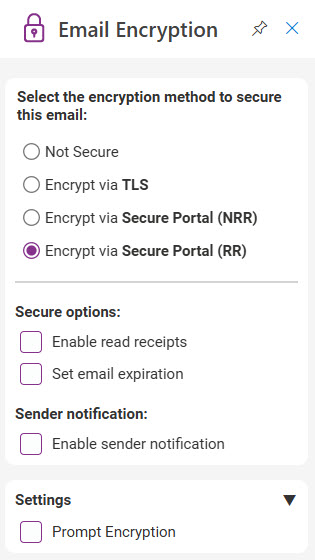
From the Email Encryption side panel, under Select an encryption method to secure this email, select one of the following encryption methods:
Note
If the encryption method you select has been disabled by your admin, the next best available method will be used instead.
Not Secure: Your email will not be encrypted.
Encrypt via TLS: The email is encrypted using TLS (Transport Layer Security) and delivered directly to the recipient's mailbox.
Encrypt via Secure Portal (NRR): The email is delivered to a secure portal, and the recipient is sent a one-time password (OTP) to view the email. The recipient does not have to set up an account on the secure portal.
Encrypt via Secure Portal (RR): The email is delivered to a secure portal, and the recipient must log in to view the email. Recipients will have to set up an account on the secure portal to view their mail.
Depending on which encryption method you use, one or all of the following options are available:
Enable sender notification: Get an email notification when your email has been delivered.
Enable read receipts: Get an email notification when your email has been opened by the recipient.
Set email expiration: Check and select a number of days if you want this email to expire after a period of time.
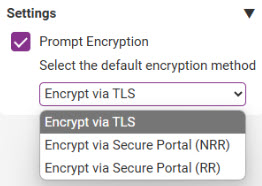
Check Settings > Prompt Encryption to be prompted about encryption every time you send an email to an external recipient.
Note
The setting to prompt encryption is not available on the classic Outlook client. It is only available on the new Outlook client and web application.
If you enable this setting, a dropdown menu appears in which you can select the default encryption method that will be used for delivering the email.
When you send an email that includes an external recipient, you'll be prompted as follows:
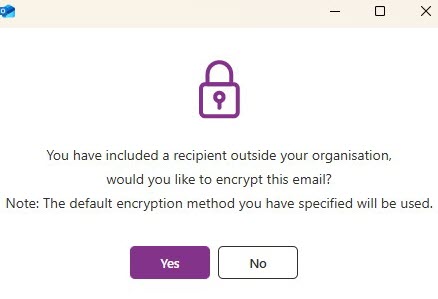
If you select Yes, the default delivery method will be used. If you select No, the email will not be encrypted.
If you don't enable this setting, you won't be prompted to consider encrypting the email for external recipients.
Select Send to send your email with the selected settings applied.